newspaint

Documenting Problems That Were Difficult To Find The Answer To

Monthly Archives: Jan 2013

Fixing Ubuntu Hosts File So CORBA Listener Knows The Right Address

The Problem

So the situation is this. I have a Java script that creates a “listener” (i.e. a server) in CORBA that will be communicated over another CORBA connection as the location to be connected to. In Wireshark I see this as as packet with the following fields:

Profile ID: TAG_INTERNET_IOP (0)
IIOP::Profile_host: 127.0.1.1
IIOP::Profile_port: 49170

Now this is no good. Any remote service that tries to connect to 127.0.1.1 will end up trying to communicate with itself (127.* is the loopback address).

The Solution

We need a way of letting Java CORBA figure out for itself what the IP address of the host we’re running our program on is.

The problem, in Ubuntu 12.04.1 at least, is that the /etc/hosts file contain the following entries by default (the problem line is highlighted in bold):

127.0.0.1       localhost
127.0.1.1       myserver.mydomain  myserver

# The following lines are desirable for IPv6 capable hosts
::1     ip6-localhost ip6-loopback
fe00::0 ip6-localnet
ff00::0 ip6-mcastprefix
ff02::1 ip6-allnodes
ff02::2 ip6-allrouters

What we need to do is comment out this 127.0.1.1 entry and replace it with the current IP address and uname of the host.

If, like me, you are connected by way of interface eth0 then you can perform the necessary change using the following one-liner:

MYNAME=`uname -n` \
MYIP=`ifconfig eth0 |perl -ne 'print $1 if m/:(\d+\.\d+\.\d+\.\d+)/'` \
perl -i.bak -pe "s/^(127.0.1.1.*$)/#\$1\\n\$ENV{MYIP} \$ENV{MYNAME}/" /etc/hosts

Result

This will result in a /etc/hosts file that will look something like the following:

127.0.0.1       localhost
#127.0.1.1      myserver.mydomain  myserver
10.191.22.14 myserver

# The following lines are desirable for IPv6 capable hosts
::1     ip6-localhost ip6-loopback
fe00::0 ip6-localnet
ff00::0 ip6-mcastprefix
ff02::1 ip6-allnodes
ff02::2 ip6-allrouters

PHP Reports Compiler Globals Problem

My friend was having issues with PHP 5.3 compiled from ports in FreeBSD:

root@myserver:~# php
Failed loading /usr/local/lib/php/20090626-zts/ioncube/ioncube_loader.so:  /usr/local/lib/php/20090626-zts/ioncube/ioncube_loader.so: Undefined symbol "compiler_globals"

The solution was documented as:

20120516:
  AFFECTS: users of lang/php5
  AUTHOR: ale@FreeBSD.org

  PHP has been updated to 5.4. Suhosin patch has been disabled until the
  new version will be released (soon). Suhosing extension will take more
  time. LINKTHR option is now enabled by default, be sure to flag it if
  you are updating using an old saved configuration. sqlite2 extension
  has been permanently removed.
  If you want to remain at PHP 5.3, a new port (lang/php53) has been
  created for such purpose.

It also affects php 5.3.

So to solve, when running “make config”, tick the following box:

[X] LINKTHR    Link thread lib (for threaded extensions)

Ubuntu 12.04.1 Apache Not Listing Directory Contents

This was frustrating me for weeks.

I had a fairly standard out-of-the-box Apache configuration with SSL. My Apache was set up as:

root@myserver:/etc/apache2# apache2 -V
Server version: Apache/2.2.22 (Ubuntu)
Server built:   Nov  8 2012 21:37:30
Server's Module Magic Number: 20051115:30
Server loaded:  APR 1.4.6, APR-Util 1.3.12
Compiled using: APR 1.4.6, APR-Util 1.3.12
Architecture:   64-bit
Server MPM:     Prefork
  threaded:     no
    forked:     yes (variable process count)
Server compiled with....
 -D APACHE_MPM_DIR="server/mpm/prefork"
 -D APR_HAS_SENDFILE
 -D APR_HAS_MMAP
 -D APR_HAVE_IPV6 (IPv4-mapped addresses enabled)
 -D APR_USE_SYSVSEM_SERIALIZE
 -D APR_USE_PTHREAD_SERIALIZE
 -D SINGLE_LISTEN_UNSERIALIZED_ACCEPT
 -D APR_HAS_OTHER_CHILD
 -D AP_HAVE_RELIABLE_PIPED_LOGS
 -D DYNAMIC_MODULE_LIMIT=128
 -D HTTPD_ROOT="/etc/apache2"
 -D SUEXEC_BIN="/usr/lib/apache2/suexec"
 -D DEFAULT_PIDLOG="/var/run/apache2.pid"
 -D DEFAULT_SCOREBOARD="logs/apache_runtime_status"
 -D DEFAULT_LOCKFILE="/var/run/apache2/accept.lock"
 -D DEFAULT_ERRORLOG="logs/error_log"
 -D AP_TYPES_CONFIG_FILE="mime.types"
 -D SERVER_CONFIG_FILE="apache2.conf"

The autoindex module was loaded:

root@myserver:/etc/apache2# apachectl -t -D DUMP_MODULES
apache2: apr_sockaddr_info_get() failed for myserver
apache2: Could not reliably determine the server's fully qualified domain name, using 127.0.0.1 for ServerName
Loaded Modules:
 core_module (static)
 log_config_module (static)
 logio_module (static)
 mpm_prefork_module (static)
 http_module (static)
 so_module (static)
 alias_module (shared)
 auth_basic_module (shared)
 authn_file_module (shared)
 authz_default_module (shared)
 authz_groupfile_module (shared)
 authz_host_module (shared)
 authz_user_module (shared)
 autoindex_module (shared)
 cgi_module (shared)
 deflate_module (shared)
 dir_module (shared)
 env_module (shared)
 fastcgi_module (shared)
 mime_module (shared)
 negotiation_module (shared)
 reqtimeout_module (shared)
 rewrite_module (shared)
 setenvif_module (shared)
 ssl_module (shared)
 status_module (shared)
Syntax OK

I could list directory contents for the non-SSL site, but the SSL site would return 403 Forbidden and put the following entries in the error.log file:

[Tue Jan 29 14:03:31 2013] [error] [client 127.0.0.1] client denied by server configuration: /var/www/secure/test/index.html
[Tue Jan 29 14:03:31 2013] [error] [client 127.0.0.1] client denied by server configuration: /var/www/secure/test/index.htm

Inside my /etc/apache2/sites-enabled/001-default-ssl configuration file I had the following entries:

        DocumentRoot /var/www/secure
        <Directory />
                Options FollowSymLinks
                AllowOverride None
                Order deny,allow
                deny from all
        </Directory>

        <Directory /var/www/secure/>
                Options Indexes FollowSymLinks MultiViews
                AllowOverride All
                Order allow,deny
                allow from all
        </Directory>

So Indexes was enabled for the document root for the SSL site! So why was I getting a 403?

I could list directories for my non-SSL site and it was configured as follows:

        DocumentRoot /var/www
        <Directory />
                Options FollowSymLinks
                AllowOverride None
        </Directory>
        <Directory /var/www/>
                Options Indexes FollowSymLinks MultiViews
                AllowOverride None
                Order allow,deny
                allow from all
        </Directory>

        <Directory /var/www/secure/>
                Order deny,allow
                deny from all
        </Directory>

Solution: apparently having the following in any .htaccess file in the path of the folder prevented the directory listings:

    <FilesMatch "\.ht.*">
        Deny from all
    </FilesMatch>

I guess this is because the expression was designed to filter out .htaccess and .htpasswd but actually filtered out .html and .htm – and perhaps as the DirectoryIndex configuration parameter caused Apache to look for index.html and index.htm before calling autoindex it was being thwarted by the above filter.

Removed this and now getting my directory listings!

Dealing With Firefox’s Context-Menu On Top Of Google Document’s Context-Menu

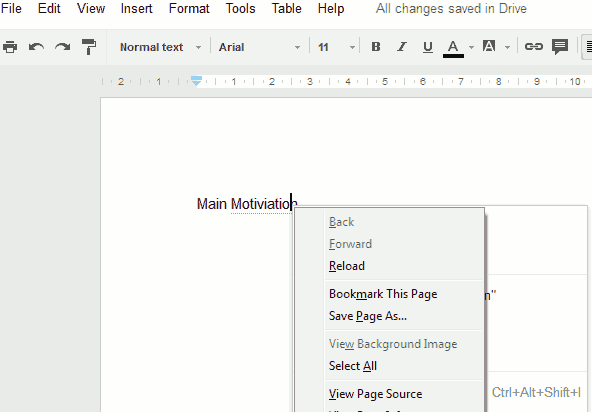
So you’re using Mozilla Firefox (on Windows 7) and right-click on a spelling error… and up comes Mozilla’s context menu on top of Google’s context menu. As in the following image:

Firefox's context menu on top of Google's context menu

Firefox’s context menu on top of Google’s context menu

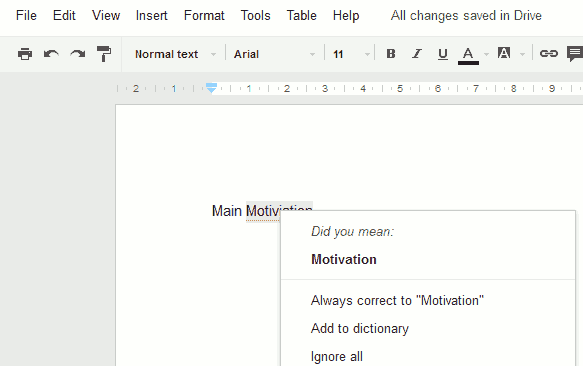
This wasn’t a problem for me in the past – I just hit ESC – but this stopped working (it made both the Firefox and Google menus disappear). But if I press the Alt key (and release) then the Firefox menu goes away leaving the Google menu remaining as in the following image:

After pressing Alt the Google context menu remains

After pressing Alt the Google context menu remains

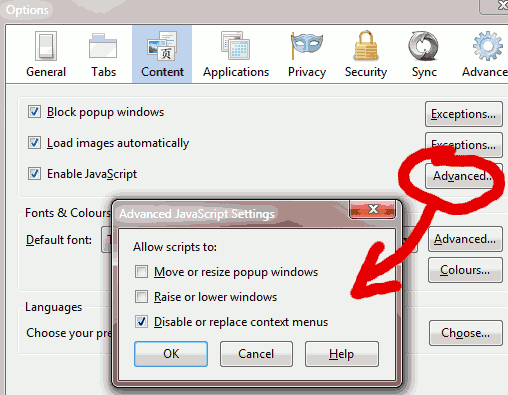
I do believe you can configure Firefox to allow websites to take control of the context menu by updating the JavaScript settings (see the next image) but I personally prefer Firefox to stop websites hijacking the context-menu.

Firefox advanced JavaScript settings to permit websites hijacking the context-menu

Firefox advanced JavaScript settings to permit websites hijacking the context-menu

Mail Hasn’t Been Delivered By Royal Mail

I had a problem: I hadn’t received mail for several days even though I had been expecting a few 1st class deliveries.

So I called the customer help line on 08457 740 740. Then pressed “2” for residential issues, “4” for advising of a problem or complaint, then “3” for “anything else” after which I was put through to a customer service operator (real human being) after a wait.

I told the operator I hadn’t received mail for a few days. I was asked for my postcode, which I gave, after which the operator checked their computer to find out the last date the route had “been walked” – which turned out to be today (so hoping the mail will be there when I check tonight). I was impressed they had access to that information!

Quick Perl Script To Decode URL Encoding

Run the following command line:

perl -pe 's/%([a-fA-F0-9]{2})/chr(hex($1))/ge'

Cut and paste your URL encoded string, press enter, and the decoded version will be printed.

Using the JMeter BeanShell Sampler to Write to the Response Data Tab of the Results Tree

It may be desirable to write information to the “Response data” tab of a BeanShell sampler’s result in the “View Results Tree” listener in JMeter.

This can be achieved using the basic code as an example:

String output = "";
output += "hello\n"; // append "hello" and a newline
output += "world!\n"; // append "world!" and a newline

SampleResult.setResponseData( output );
SampleResult.setDataType( org.apache.jmeter.samplers.SampleResult.TEXT );

Tested using JMeter 2.8 on Linux.

Other JMeter BeanShell Tricks

Listing All the Thread Context Variables

Quick and Dirty

import java.util.Map;

org.apache.jmeter.threads.JMeterVariables vars = ctx.getVariables();

String output = "";
output += "varcount = " + vars.entrySet().size() + "\n";

// iterate over variables
for ( Map.Entry entry : vars.entrySet() ) {
  output += "  - \"" + entry.getKey() + "\" => \""
    + entry.getValue().toString() + "\"\n";
}

SampleResult.setResponseData( output );
SampleResult.setDataType( org.apache.jmeter.samplers.SampleResult.TEXT );

Note that the type returned by vars.entrySet() is actually a Set<Map.Entry<String,Object>> but BeanShell does not allow the angle brackets to be used. The above, however, is still valid (without the angle brackets).

Keywords Alphabetical Order

The following (tested with JMeter 2.8 BeanShell listener) lists the variables in alphabetical order:

import java.util.Map;

org.apache.jmeter.threads.JMeterVariables vars = ctx.getVariables();

// store text to be displayed in a String variable
StringBuffer output = new StringBuffer( "" );
output.append( "varcount = " + vars.entrySet().size() + "\n" );

// convert to array of keys (so we can sort later)
String[] keys = new String[ vars.entrySet().size() ];
int idx = 0;
for ( Map.Entry entry : vars.entrySet() ) {
  keys[idx] = entry.getKey();
  idx = idx + 1;
}

// sort
java.util.Arrays.sort( keys );

// display
for ( String key : keys ) {
  Object value = vars.getObject( key );
  if ( value != null ) {
    output.append( "  - \"" + key + "\" => \""
      + value.toString() + "\"\n"
    );
  } else {
    output.append( "  - \"" + key + "\" => unknown\n" );
  }
}

SampleResult.setResponseData( output.toString() );
SampleResult.setDataType( org.apache.jmeter.samplers.SampleResult.TEXT );

Putting Xubuntu On An ASUS S400CA VivoBook

Want to disable the touchpad in Windows 8? Press Fn-f9!

Fn-f9 to disable VivoBook touchpad

Fn-f9 to disable VivoBook touchpad

I bought an Asus S400CA VivoBook which had Windows 8 pre-installed. Out of the box it had a smattering (3) of small partitions at the start of the 500GB hard drive, one large Windows partition, and one unused (“Data”) partition. It was my intention to put 64-bit Linux (Xubuntu, a variant of Ubuntu) on the “Data” partition.

Warning: this was not straightforward or easy. The UEFI boot process is so complex that nowhere is it documented simply. It took me 3 full hours and a lot of swear words.

So I mostly followed the instructions I posted in my blog here by blowing away the “Data” partition and replacing it with 3 new partitions (one for /boot, one for /, and a swap partition). No, scratch that, I needed to make 4 new partitions – because the UEFI booting mechanism on the laptop required me to create a small (~100MB) partition for bios_grub. Oh and I had to use gparted (not fdisk) because dynamic partitions are not supported in fdisk.

Once I had my 4 new partitions I set up encryption on the / partition, set up the crypttab and fstab files for encrypted swap, and was all ready to go except that I discovered I needed to install the grub-efi-amd64 package and then re-run grub. After that it is all a bit of a blur. I don’t know if I cast some magic runes while trying to run grub-install or what but eventually I gave up and rebooted and discovered my Ubuntu partition magically found by the BIOS.

How Do I Boot Another Drive/Partition On The VivoBook?

Method 1: press F2 while booting to get into the BIOS of the VivoBook. Then navigate to the Save tab and you will have an option to override (i.e. select the device you want to boot from) the default boot settings for this boot only.

Method 2: press ESC while booting to get a boot menu.

What is Launch CSM?

I don’t really know. But CSM stands for “Compatibility Support Module”. It might be helpful booting non-EFI devices.

In Xubuntu How Do I Disable That Annoying Tap-To-Click On The Touchpad?

Execute the following script every time you boot:

# fix touchpad - turn off tap to click
/usr/bin/synclient MaxTapTime=0

I put this script into ~/Desktop/Autostart/ but XFCE warned me that the file should really be put into ~/.config/autostart instead (so I did).

Also the right button on the touchpad wouldn’t work in XFCE while an external mouse right-button would work. So I followed the instructions at the top of this post. This recommends that you do the following:

mkdir /etc/X11/xorg.conf.d/
cp /usr/share/X11/xorg.conf.d/50-synaptics.conf /etc/X11/xorg.conf.d/

Then edit /etc/X11/xorg.conf.d/50-synaptics.conf and add the following after MatchDevicePath:

	Option "TapButton1" "1"
	Option "TapButton2" "2"
	Option "TapButton3" "3"
	Option "ClickPad" "1"
	Option "EmulateMidButtonTime" "0"
	Option "SoftButtonAreas" "50% 0 82% 0 0 0 0 0"

In Xubuntu How Do I Disable The Window Roll Up Effect?

Go to the Settings Editor, channel xfwm4, expand “general”, double click on mousewheel_rollup and uncheck “enabled”.

How do I get Ethernet in Xubuntu 12.04?

Follow the instructions in this blog post which state:

apt-get install linux-backports-modules-cw-3.4-precise-generic
modprobe alx

The Wi-Fi Signal Is Terrible!

Update 2013-12-24

Following Timo Jyrinki’s entry in this blog post I was very happy to have solved this problem.

Commands to execute were:

Now I get signal strength of -51dBm (link quality 59/70 and bit rate of 58.5Mbps).

Previous Comment on This

I can’t help you. I am getting -78dB signal strength when typing “iwconfig wlan0” on this laptop whereas on an older and smaller Asus laptop with Ubuntu on it is giving me -54dB signal strength for the same router and same location. There is clearly a huge problem with the driver for this laptop’s wireless card. I’ve tried compiling the ath9k driver from the compat-wireless site but this, when it worked, did not improve things. I’ve tried turning ANI off with no improvement. I’ve tried turning hardware encryption off (nohwcrypt) to no avail. Sure – the wireless works – but not nearly as well as it should.

TP-Link TL-WN722NC

So in the end I’ve bought an external wi-fi USB device. I bought the TP-Link TL-WN722NC which requires the ath9k_htc driver. In Xubuntu 12.04.1 I kept getting xhci: “no room on ep ring” errors and discovered I needed to install the latest kernel debian packages from http://kernel.ubuntu.com/~kernel-ppa/mainline/v3.4-precise/ downloading:

  • linux-headers-3.4.0-030400-generic_3.4.0-030400.201205210521_amd64.deb
  • linux-headers-3.4.0-030400_3.4.0-030400.201205210521_all.deb
  • linux-image-3.4.0-030400-generic_3.4.0-030400.201205210521_amd64.deb

I did this and installed them all using “dpkg –install linux-*.deb” and rebooted. Then my TP-Link wireless USB device began working fine with a full strong signal.

My Microsoft Bluetooth Mouse Scrolls Too Fast Using the Middle Wheel

See this Ubuntu thread. Essentially the tiny USB transmitter has a memory of sorts – and if you dual-boot into Windows and then dual-boot back into Linux it will continue to use settings from Windows that will result in 3 lines per mouse wheel movement rather than 1.

The solution? Pull out the USB transmitter – and plug it back in. The mouse wheel will scroll at normal speed now.
Perl LWP or Mechanize Certificate Verify Failed

The Problem

Sometimes SSL certificates are not valid because the domain in the certificate does not match the domain of the URL being fetched.

The following example script demonstrates this with WWW::Mechanize (although the issue is the same with LWP::UserAgent and the fix is also the same):

#!/usr/bin/perl -w

use WWW::Mechanize;
use strict;

my $ua = WWW::Mechanize->new();
my $resp = $ua->get( "https://ccc.de/" );
if ( ! $resp->is_success ) {
    die( "Failed to fetch: " . $resp->status_line );
}
print( "Fetched\n" );

When run the following output is produced:

Error GETing https://ccc.de/: Can't connect to ccc.de:443 (certificate verify failed) at /tmp/test.pl line 7

When using LWP::UserAgent instead of WWW::Mechanize the error message is very similar:

Failed to fetch: 500 Can't connect to ccc.de:443 (certificate verify failed) at /tmp/test.pl line 9.

The Solution

The quick-and-dirty fix was documented on this blog post: set the verify_hostname flag to zero using the ssl_opts() function – as shown in the updated script:

#!/usr/bin/perl -w

use WWW::Mechanize;
use strict;

my $ua = WWW::Mechanize->new();
$ua->ssl_opts( 'verify_hostname' => 0 );
my $resp = $ua->get( "https://ccc.de/" );
if ( ! $resp->is_success ) {
    die( "Failed to fetch: " . $resp->status_line );
}
print( "Fetched\n" );

Note that the more correct solution is to tell Perl what certificates are valid and acceptable – this is a lot more work but necessary if you want your script to be more secure.

Making Windows 7 A Wifi Repeater

This technique also works with Windows 8.

I have a powerful laptop. A laptop to rival desktops. And its wifi antenna is more sensitive than any of my other wifi devices and can access the free wifi connection down the road.

So I was wondering – can I simultaneously access the wi-fi down the road while being an access point to all my smaller devices in my room? The answer is yes. And the answer is documented in this descriptive post on a Toms Hardware forum.

Articles can disappear, however, and I think this is an amazing tip so I’m going to re-document it here. But credit does not go to me for this one.

2013-04-22 Update: note this linked article on lifehacker.com appears to show an alternative way to do this that is entirely GUI-based. I’ve not tried it but you may as well try it out first and return to this article if it doesn’t work out for you.

Creating the Hosted Wifi Connection

You have to create a hosted wifi connection. So start by pressing the Windows 7 start button (or pressing ctrl-escape which does the same thing). Then type “cmd” and right click on “cmd.exe” and choose “Run as administrator”.

Next type the following:

netsh wlan set hostednetwork mode=allow ssid=MySSID key=mysecret

.. where MySSID is the name of the access point you want to create and mysecret is the password – note that the password has to be 8 characters in length minimum.

This will create an adaptor of type “Microsoft virtual WiFi miniport adapter” in your network connections. Which you can see by opening the start menu and typing “Network” and selecting “View Network Connections”.

Starting the Hosted Network

Type:

netsh wlan start hostednetwork

This will start the hosted network connection. But you’re not all done yet. Sure your other wi-fi devices will see your new access point name! However you have to add network sharing.

So open the “View Network Connections” window. Right click on your source network (most likely “Wireless Network Connection” which is currently connected to the Internet already). Select “properties”. Then the “Sharing” tab. Now tick the “Allow other network users to connect through this computer’s Internet connection”. And choose the hostednetwork you just created!

Now you can start connecting to the Internet from your other devices.

Stopping the Hosted Network

Type:

netsh wlan stop hostednetwork