newspaint

Documenting Problems That Were Difficult To Find The Answer To

Monthly Archives: Aug 2012

How To Retrieve Your T-Mobile UK MMS

EDIT3: 2014-10-08 there is another MMS link at www.mms.t-mobile.co.uk/mmcpA/ but it refuses to let anybody log in with their phone number and provided password as promised. EE appear to me to be a shamefully incompetent and disrespectful firm – with no ability to contact a human, or ability to provide the services they promise. Worse, I know that EE were vulnerable to heartbleed on their commercial servers for weeks after the vulnerability became public knowledge. This is a company that seems to be asking to be sued out of operational existence. I will be porting my number in the not-to-distance number because I’m fed up with how I’ve been treated as an ex T-Mobile customer.

EDIT2: there is a MMS link at www.mms.t-mobile.co.uk/mmcpb/ – you can try your luck there!

EDIT: it appears EE have gone and removed the (barely) functional T-Mobile website. The new EE website is dysfunctional in so many ways – and there’s no way of complaining to EE about it. A technology company that doesn’t do technology? It is extremely poor form and I think that if a company cannot even handle something as simple as transitioning to a new website then you cannot possibly have any confidence in more complex parts of their business – such as MOBILE TELEPHONY.


This was frustrating me! I tried in FireFox, then Chrome, then Internet Explorer and couldn’t retrieve my photo! But finally I found a way and I will share this with you.

We start by getting a SMS of the following form:

You’ve got a picture message from +447xxxxxxxxx. View it once within 14 days at http://www.t-mobile.co.uk/pmcollect with your number and the password: ab3qe99k

Righteo – off to http://www.t-mobile.co.uk/pmcollect and what do we see from FireFox?

Warning About Wrong Browser Type

Warning About Wrong Browser Type

That warning says:

You are using another browser that is not Internet Explorer 6.0 or above. With the browser that you are using we cannot guarantee the full functionality of this website

So ignore that – just click OK – and we get the next screen where we enter the details as required:

Enter your phone number and the code sent to you in the SMS

Enter your phone number and the code sent to you in the SMS

Now you will have a message list! Frustratingly no amount of clicking the tick box or pressing “Select All” will do anything. It simply won’t work. Instead you have to click on the from, date, or expiry time fields! So difficult to discover but that is the trick!

The secret is to click on the writing of a field of the message

The secret is to click on the writing of a field of the message

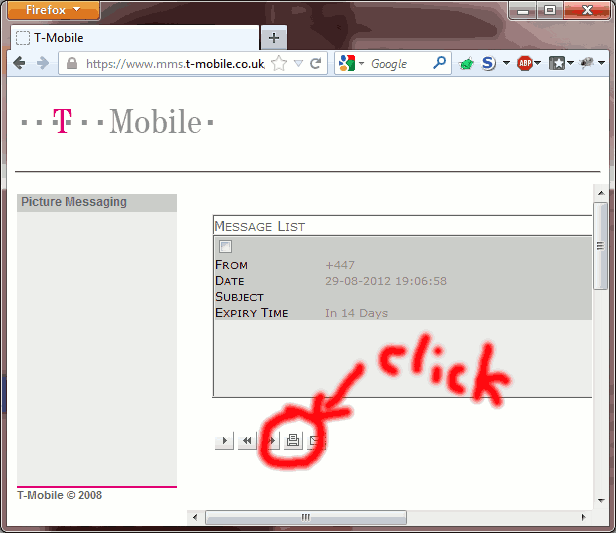
Now you will see the message list – again – but this time underneath there is a printer icon. Click it.

Click on the printer icon underneath

Click on the printer icon underneath

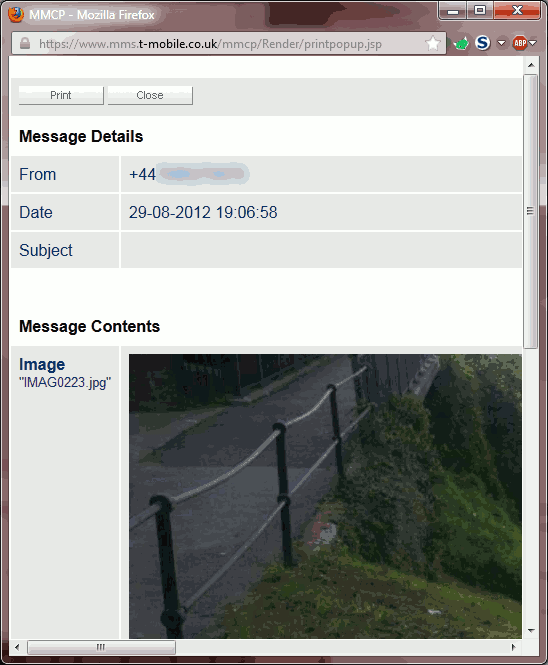
A popup will appear with your message. Of course you can right-click on the picture and save it!

You can now see your image in a pop-up

You can now see your image in a pop-up

Dumping Stacks of Running Programs

This post is likely to be a work in progress as I collate information that is useful to me on the one post.

I find it incredibly useful to dump the stack of a running program. This is especially useful when a program “freezes” instead of crashes – because it helps you to isolate where the program has gone wrong. Perhaps it is a tight CPU loop (as a result of a poorly written while { } loop which didn’t update the conditional variable correctly) or the code is blocking on something such as I/O or, worst case scenario, a mutex that is held by another thread waiting for a mutex the other thread is holding (deadlock).

Java

The jstack program is wonderful. You can give a process identifier (PID) and jstack will dump the stacks of all the threads in the Java application. I found this incredibly useful as a system administrator on a Java/Tomcat web estate – and solved deadlock issues as well as HTTP client throttling issues (one of the Apache HTTP classes defaulted to a maximum of 2 simultaneous connections to a single back end causing blocking).

Solaris/Linux C/C++

pstack

The pstack program is also wonderful. Give it a process identifier (PID) and it will do its best to verbalise the stack of the running process.

Apparently pstack exists for 32-bit Linux and on RedHat 64-bit. But no Ubuntu/Debian pstack for 64-bit.

gdb

One alternative on 64-bit Debian is to try that suggested in this link (found in this thread post):

gdb --q --n --ex bt --batch --pid PID

Linux /proc

Every process in Linux has a subdirectory in the /proc filing system with the path name /proc/<PID>/ (where PID is the process identifier number) and inside this directory is the stack file (i.e. /proc/<PID>/stack) which appears to contain any system calls if in the middle of such – or effectively nothing if in the middle of running user code.

Perl

Getting a Perl stack from a running Perl binary can be difficult.

cpan install App::Stacktrace
perl-stacktrace -m >plstack.gdb
gdb -p pid -x plstack.gdb

C#

Mono

kill -QUIT pid

How To Add A Port Forward Using The Web Interface On OpenWrt 10.03.1

I’ve seen forum posts ask about how one can open a port on their router to forward to their PS3 (for example) and so I’ve decided to put together this quick how-to with the web interface the router provides.

In this example we’ll open port 80 (the HTTP port) from the outside world and re-direct any traffic that comes in to a specific machine in our local network. In this example it is assumed that the address of the router is 192.168.1.1 and that the local machine in our network (the HTTP server) will be on 192.168.1.3. Your specific network may be different – your PS3 might be on a different IP address internally and the port you want to use might be 5223 – and if you have several ports you’ll have to go through these stages for each port.

The following figure illustrates the connection from the Internet to the device you are wanting to forward traffic to:

Connection Diagram of Port Forward through OpenWRT Router

Connection Diagram of Port Forward through OpenWRT Router

Open a web browser page to the router (this usually requires visiting something like http://192.168.1.1/ or whatever you picked for your router) and then logging in.

Next select the “Network” tab at the top of the page, and then “Firewall” sub tab.

Select the Network tab at the top of the page, then the Firewall sub-tab

Select the Network tab at the top of the page, then the Firewall sub-tab

About halfway down the Firewall page there will be a box titled “Redirections”. Find it and press the
“Add” button.

Find the Redirections box in the Firewall page and press the Add button

Find the Redirections box in the Firewall page and press the Add button

Now give your new port-forwarding rule a name – it can be anything – for example in this case “incoming_80” was chosen. Next you can decide which protocols to forward – you can choose TCP, UDP, or TCP AND UDP (TCP+UDP). If you don’t know – pick TCP+UDP.

Choose a name for the new port-forwarding rule and which protocols to forward

Choose a name for the new port-forwarding rule and which protocols to forward

Then you must pick the port to forward (i.e. incoming packets to the router hitting this port will be forwarded.. usually it is the same number as the port of your internal device you want forwarded). In this case it is port 80. Then you have to pick the IP address of your internal device (e.g. web server, PS3) to forward the packet to – OpenWRT will offer a drop-down list of IP addresses it has detected on your internal network to make this easier – in this case 192.168.1.3 was entered). Finally enter the port number of the internal device the packets should be forwarded to; this doesn’t have to be the same as the port the router is listening to on the Internet – but is usually the same. Don’t forget to Save & Apply!

Enter the WAN port to forward, the IP address to forward to, and optionally the port to forward to

Enter the WAN port to forward, the IP address to forward to, and optionally the port to forward to

When you return to the Firewall page (after saving) you will see your new rule in the Redirections box. You can add another rule now if you have more ports to forward!

You will see your new rule in the Redirections box on the Firewall page

You will see your new rule in the Redirections box on the Firewall page

All done!

Making Apartment Windows Open Wider

Frustrated by windows that barely open at all? I was. In a perpetually hot apartment during the summertime I desperately wanted air to flow through in the evenings to cool the place down. But the furthest I could open my windows was this:

the widest my window would open

the widest my window would open

Today I discovered how to open the windows wider – without breaking anything!

The Solution

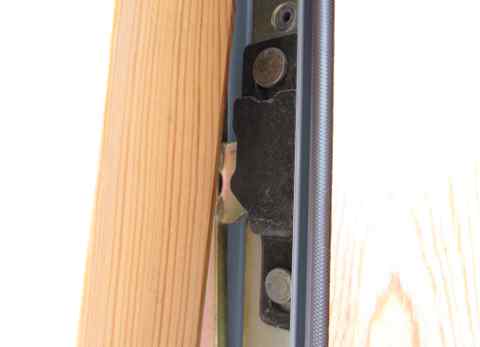
With the window opened as above – I looked on the right hand side of the frame – and saw this:

view of the right-hand-side of the window frame when slightly ajar

view of the right-hand-side of the window frame when slightly ajar

I pushed the black bracket upwards.

push the black bracket upwards

push the black hinge upwards

With the black hinge up it allowed the window to release and open wide.

the circled latch is freed from the black bracket and the window can swing open

the circled latch is freed from the black bracket and the window can swing open

Now the window is wide open as in the following photograph:

fully open window now

fully open window now

Next time you pull the window shut the black bracket will slide up and down to latch the window into the narrow-gap mode again.