newspaint

Documenting Problems That Were Difficult To Find The Answer To

Category Archives: OpenWRT

OpenWRT/LEDE Buffalo WZR-HP-AG300H Getting 5GHz Radio Working

I had a problem with my Buffalo WZR-HP-AG300H, I couldn’t get the 5GHz radio wireless interface working along with the 2.5GHz radio.

In the end I used the following /etc/config/wireless configuration:

config wifi-device 'radio0'
        option type 'mac80211'
        option phy 'phy0'
        option txpower '7'
        option country 'GB'
        option hwmode '11g'
        option channel '7'
        option htmode 'HT20'

config wifi-device 'radio1'
        option type 'mac80211'
        option phy 'phy1'
        option txpower '9'
        option country 'GB'
        option hwmode '11a'
        option channel '120'
        option htmode 'HT40'

config wifi-iface
        option device 'radio0'
        option mode 'ap'
        option ssid 'my2500KHz'
        option network 'wlan'
        option encryption 'psk2'
        option key 'password'
        option wmm '0'

config wifi-iface
        option device 'radio1'
        option mode 'ap'
        option ssid 'my5GHz'
        option network 'wlan'
        option encryption 'psk2'
        option key 'password'
        option wmm '0'

This configuration seemed to work for me only after I rebooted the router.

Windows 10 TCP/Internet Slow With Chrome and OpenWRT Router

So I was having issues getting a Windows 10 laptop running Google Chrome connected via wifi to a router running OpenWRT Chaos Calmer 15.05.1.

The Windows 10 laptop would take a long time to establish a connection and then a long time for any data to transfer at an incredibly slow rate.

At first I thought it was Google Chrome but downloaded Firefox and was still having the same issues.

There are many proposed solutions but the commands that appeared to make a magical difference and instantly speed things up were:

netsh interface tcp show global
netsh interface tcp set global autotuning=disabled

At this stage things did not magically get better.

Then I tried:

netsh interface tcp show heuristics
netsh interface tcp set heuristics enabled

Now the Internet suddenly got quicker.

To undo these changes (if they don’t work for you):

netsh interface tcp set global autotuning=normal
netsh interface tcp set heuristics disabled

Also, because I messed around with the MTU on the WiFi interface I had to run the following to restore things to a relatively normal default:

netsh interface ipv4 set subinterface “WiFi” mtu=1458 store=persistent

Adding Huawei E160E To OpenWRT

I wanted to add a Huawei E160E USB 3G modem to OpenWRT but had some trouble getting it to work.

I used documentation from three places:

In this case I used a latest snapshot from the LEDE project. It turns out the router would simply lose networking, I’d be unable to SSH or access it via the web, after several minutes. Perhaps this was because I was forcing kmod’s with a slightly incompatible kernel. In the end I went back to Chaos Calmer 15.05.1 from OpenWRT which seemed to be more stable for me.

It turned out that I needed to add some more packages, specifically:

  • usbutils – to run “lsusb” to see when my USB devices had been detected
  • kmod-usb-uhci – ultimately I needed a kmod to see the USB controller in order to detect attached devices
  • kmod-usb2 – just in case the UHCI controller module above didn’t work

Note that when adding kmods then opkg might reject it with a LEDE build if package slightly out of sync with the kernel build, in which case use –force-depends (don’t do this, it might result in an unstable router):

opkg install --force-depends kmod-usb-uhci

Now, also ensure that the /etc/modules.d/usb-serial has the following line:

usbserial vendor=0x12d1 product=0x140c maxSize=4096

The vendor and product values are taken from the output of lsusb:

# lsusb
Bus 001 Device 002: ID 12d1:140c Huawei Technologies Co., Ltd. E180v

Once connected the signal strength can be obtained on the command line by running:

# comgt -d /dev/ttyUSB3
SIM ready
Waiting for Registration..(120 sec max)
Registered on Home network: "50502",2
Signal Quality: 13,99

The result can be looked up in the table at this link:

Value RSSI dBm Condition
2 -109 Marginal
3 -107 Marginal
4 -105 Marginal
5 -103 Marginal
6 -101 Marginal
7 -99 Marginal
8 -97 Marginal
9 -95 Marginal
10-93OK
11-91OK
12-89OK
13-87OK
14-85OK
15 -83 Good
16 -81 Good
17 -79 Good
18 -77 Good
19 -75 Good
20 -73 Excellent
21 -71 Excellent
22 -69 Excellent
23 -67 Excellent
24 -65 Excellent
25 -63 Excellent
26 -61 Excellent
27 -59 Excellent
28 -57 Excellent
29 -55 Excellent
30 -53 Excellent

Adding a dynamicdns.org Domain To OpenWRT Barrier Breaker

So you’re running OpenWRT version 14.07 (Barrier Breaker). And you’ve got a dynamically updating domain name from dynamicdns.org.

You want to configure your router to update your dynamic domain address to that of your WAN interface.

First things first, install the luci-app-ddns package on your router. Then reboot your router and log into the LuCI web interface.

Next navigate to the Services -> Dynamic DNS page:

Navigate to the Services > Dynamic DNS page

Navigate to the Services > Dynamic DNS page

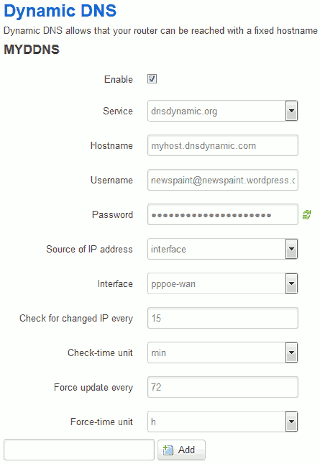
Enter the dynamic DNS provider and account details

Enter the dynamic DNS provider and account details

Then enter the details of your dynamic domain name, your username and password.

Set the source of the IP address to interface and the interface to be your WAN interface (in my case my WAN interface is PPPoE).

That’s all there is to it!

If you are using an older version of OpenWRT you may wish to create a script to update the dynamic DNS. If this is the case then please visit this blog article.

Upgrading OpenWRT to Barrier Breaker 14.07-rc2

On my Buffalo WZR-HP-AG300H I thought it was time to upgrade from Attitude Adjustment to Barrier Breaker. (See below for upgrading to 14.07-rc3).

So I downloaded image openwrt-ar71xx-generic-wzr-hp-ag300h-squashfs-sysupgrade.bin and uploaded that to the router using the LuCI web interface on the router (System -> Backup/Flash Firmware -> Flash new firmware image).

Well the router rebooted. But there was a problem. No web server. No LuCI web configuration application. The latest OpenWRT firmware wiki page states that:

Prebuilt trunk images do not come with any web interface or GUI. You will need to be comfortable using a command line and remote shell to install one yourself: LuCI Essentials

Fortunately the Ethernet networking was still functioning. So I had to install LuCI. But it wasn’t so simple.

user@home# ssh root@192.168.176.1

BusyBox v1.22.1 (2014-07-21 23:44:00 CEST) built-in shell (ash)
Enter 'help' for a list of built-in commands.
  _______                     ________        __
 |       |.-----.-----.-----.|  |  |  |.----.|  |_
 |   -   ||  _  |  -__|     ||  |  |  ||   _||   _|
 |_______||   __|_____|__|__||________||__|  |____|
          |__| W I R E L E S S   F R E E D O M
 -----------------------------------------------------
 BARRIER BREAKER (14.07-rc2, r41815)
 -----------------------------------------------------
  * 1/2 oz Galliano         Pour all ingredients into
  * 4 oz cold Coffee        an irish coffee mug filled
  * 1 1/2 oz Dark Rum       with crushed ice. Stir.
  * 2 tsp. Creme de Cacao
 -----------------------------------------------------

root@myrouter:~# opkg update
Downloading http://downloads.openwrt.org/barrier_breaker/14.07-rc2/ar71xx/generic/packages/Packages.gz.
Updated list of available packages in /var/opkg-lists/barrier_breaker.

root@myrouter:~# opkg install luci-ssl # should but doesn't get all we need
root@myrouter:~# opkg install luci-base
root@myrouter:~# opkg install luci-i18n-english
root@myrouter:~# opkg install luci-lib-httpclient # needed for CGI to work
root@myrouter:~# opkg install luci-lib-proto-ppp # needed for PPPoE to my ISP in LuCI
root@myrouter:~# opkg install luci-app-firewall # needed for port forwards in LuCI
root@myrouter:~# /etc/init.d/uhttpd enable # needed to auto-start webserver on boot
root@myrouter:~# reboot # restart router to take new packages

Now if I haven’t skipped any steps you should be able to use your web browser to configure the router.

If you want to know what packages are available from the command line type:

opkg update; opkg list

If you want to know what packages are installed on the router type:

opkg list-installed

It seems that, at the moment, Barrier Breaker comes with a limited set of packages on default install.


Ethernet Switch Disabled by Default

Ticket #11143 documents a very real problem when upgrading to Barrier Breaker. The 4-port Gigabit Ethernet switch on the back of the router will pass traffic between router and ports, but not between ports.

The fix is to edit your /etc/config/network file and ensure the switch and switch_vlan sections are as follows:

config switch
        option name 'switch0'
        option enable_vlan '1'
        option reset '1'

config switch_vlan
        option vlan '3'
        option device 'switch0'
        option ports '0 1 2 3 4'

You can set vlan to any number from 1 to 15 (not zero). If you specify the ports string wrong the switch will silently fail (I was mistakenly trying to set it to 0 1 2 3 4 5 but that was one too many digits and the switch simply didn’t configure.

What this does: is turn on VLAN functionality in the switch. However we specify each port to be untagged (i.e. normal) and all the ports share the same VLAN (in this case I chose number 3 but any number except zero would do).

You can confirm that the switch is named switch0 by ssh’ing into the router and typing:

root@myrouter:~# swconfig list
Found: switch0 - ag71xx-mdio.0

Warning: if you can only access your router via wired Ethernet (and not radio) then you may disable access to your router – and have to TFTP flash it all over from scratch. So back up your configuration first!

You can also see what port numbers to use in the “option ports” configuration setting by issuing the following command:

root@myrouter:~# swconfig dev switch0 show |grep Port
Port 0: MAC 10:6f:3f:a7:2d:54
Port 0:
Port 1:
Port 2:
Port 3:
Port 4:

Because there are ports 0, 1, 2, 3, 4 listed then the “options ports” configuration value should be set to “0 1 2 3 4”. Note that port zero will usually be the router itself (internal).

When you are confident enter the command /etc/init.d/network restart – disconnect from the router and re-connect (or just reboot the router).

The LuCI GUI has a helpful page on the switch that lets you see which switch ports have been connected to (and what link speeds):

Barrier Breaker LuCI Switch Page

Barrier Breaker LuCI Switch Page


Upgrading to Release Candidate 3

2014-08-17: I upgraded my router to rc3 by downloading the firmware image openwrt-ar71xx-generic-wzr-hp-ag300h-squashfs-sysupgrade.bin.

I had to install LuCI again:

root@myrouter:~# opkg install luci-ssl
Installing luci-ssl (svn-r10471-1) to root...
Downloading http://downloads.openwrt.org/barrier_breaker/14.07-rc3/ar71xx/generic/packages/luci-ssl_svn-r10471-1_ar71xx.ipk.
Installing libustream-polarssl (2014-03-25-fc0b5ec804ee43c532978dd04ab0509c34baefb0) to root...
Downloading http://downloads.openwrt.org/barrier_breaker/14.07-rc3/ar71xx/generic/packages/libustream-polarssl_2014-03-25-fc0b5ec804ee43c532978dd04ab0509c34baefb0_ar71xx.ipk.
Installing libpolarssl (1.3.7-1) to root...
Downloading http://downloads.openwrt.org/barrier_breaker/14.07-rc3/ar71xx/generic/packages/libpolarssl_1.3.7-1_ar71xx.ipk.
Installing px5g (1) to root...
Downloading http://downloads.openwrt.org/barrier_breaker/14.07-rc3/ar71xx/generic/packages/px5g_1_ar71xx.ipk.
Configuring libpolarssl.
Configuring libustream-polarssl.
Configuring px5g.
Configuring luci-ssl.

root@myrouter:~# opkg install luci-i18n-english
Installing luci-i18n-english (svn-r10471-1) to root...
Downloading http://downloads.openwrt.org/barrier_breaker/14.07-rc3/ar71xx/generic/packages/luci-i18n-english_svn-r10471-1_ar71xx.ipk.
Configuring luci-i18n-english.

root@myrouter:~# opkg install luci-lib-httpclient
Installing luci-lib-httpclient (svn-r10471-1) to root...
Downloading http://downloads.openwrt.org/barrier_breaker/14.07-rc3/ar71xx/generic/packages/luci-lib-httpclient_svn-r10471-1_ar71xx.ipk.
Configuring luci-lib-httpclient.

root@myrouter:~# opkg install luci-proto-ppp
Upgrading luci-proto-ppp on root from svn-r10467-1 to svn-r10471-1...
Downloading http://downloads.openwrt.org/barrier_breaker/14.07-rc3/ar71xx/generic/packages/luci-proto-ppp_svn-r10471-1_ar71xx.ipk.
Configuring luci-proto-ppp.

root@myrouter:~# opkg install luci-app-firewall
Upgrading luci-app-firewall on root from svn-r10467-1 to svn-r10471-1...
Downloading http://downloads.openwrt.org/barrier_breaker/14.07-rc3/ar71xx/generic/packages/luci-app-firewall_svn-r10471-1_ar71xx.ipk.
Configuring luci-app-firewall.

root@myrouter:~# /etc/init.d/uhttpd enable
root@myrouter:~# reboot

First observation: the LuCI GUI has a completely different style. Not sure if I like it, yet; the layout is less compact than previously.

How To Use dnsdynamic.com With OpenWRT

Update (2014-09-03): Barrier Breaker has LuCI module support for dynamic DNS. See this blog article for details.


So you have your custom router with OpenWRT on it and you have a dynamic hostname with dnsdynamic.com or dnsdynamic.org. How do you get your OpenWRT router to send IP updates whenever you connect on the WAN interface?

In my case the WAN interface uses the pppoe-wan device. You might be using eth1 or similar – so make the appropriate changes in the following scripts for your situation.

I do it this way; create a script in /root/dnsdynamic.sh:

#!/bin/sh

WANIF="pppoe-wan"
MYHOST="newspaint.dnsdynamic.com"
USERNAME="admin@newspaint.wordpress.com"
PASSWORD="secret!Password"

MYIP=`ifconfig ${WANIF} |grep -o -E 'inet addr:([0-9.]+)' |grep -o -E '([0-9.]+)'`
URL="https://www.dnsdynamic.org/api/?hostname=${MYHOST}&myip=${MYIP}"
/usr/bin/wget -O - --no-check-certificate --http-user "${USERNAME}" --http-password "${PASSWORD}" "$URL"

Don’t forget to make the script executable:

chmod 755 /root/dnsdynamic.sh

Next, get the package “wget” for your OpenWRT router (the default doesn’t have functions for password-protected web pages, so I go to the web interface on my router, select System -> Software, [update packages if I haven’t for a while], Filter: type wget, click “Find package”, then below on the “Available packages” tab select the wget package to install).

Finally you can test the script by running it on the command line (on your router as you’ve SSH’d in as root). You should see output similar to the following:

root@myOpenWRTRouter:~# /root/dnsdynamic.sh
--2013-11-10 17:12:09--  https://www.dnsdynamic.org/api/?hostname=newspaint.dnsdynamic.com&myip=41.42.43.44
Resolving www.dnsdynamic.org... 84.45.76.100
Connecting to www.dnsdynamic.org|84.45.76.100|:443... connected.
WARNING: cannot verify www.dnsdynamic.org's certificate, issued by `/C=US/O=GeoTrust, Inc./CN=RapidSSL CA':
  Unable to locally verify the issuer's authority.
HTTP request sent, awaiting response... 401 Authorization Required
Connecting to www.dnsdynamic.org|84.45.76.100|:443... connected.
WARNING: cannot verify www.dnsdynamic.org's certificate, issued by `/C=US/O=GeoTrust, Inc./CN=RapidSSL CA':
  Unable to locally verify the issuer's authority.
HTTP request sent, awaiting response... 200 OK
Length: 6 [text/html]
Saving to: `STDOUT'

 0% [                                       ] 0           --.-K/s              nochg
100%[======================================>] 6           --.-K/s   in 0s

2013-11-10 17:12:10 (12.6 KB/s) - written to stdout [6/6]

Typical responses from dnsdynamic are nochg and good <ip_address>.

Finally – how to make it update every time you connect to the WAN?

Create a script in /etc/hotplug.d/iface named 30-dnsdynamic:

#!/bin/sh
# This script is executed as part of the hotplug event with
# HOTPLUG_TYPE=iface, triggered by various scripts when an interface
# is configured (ACTION=ifup) or deconfigured (ACTION=ifdown).  The
# interface is available as INTERFACE, the real device as DEVICE.

[ "$DEVICE" != "pppoe-wan" ] && exit 0

. /lib/functions.sh
. /lib/firewall/core.sh

fw_init
fw_is_loaded || exit 0

case "$ACTION" in
        ifup)
                /root/dnsdynamic.sh >/tmp/dnsdynamic.log 2>&1
        ;;
esac

This script triggers whenever an interface is brought up or down – but will exit if the device is not pppoe-wan and will only take action if the interface is being brought up (as this is when your interface will be assigned a dynamic IP address and so should make the IP address notification).

Trying Out OpenWRT 12.09-Beta On Buffalo WZR-HP-G300NH

Update: Note that as of 2012-11-22 there is a release candidate available at openwrt-ar71xx-generic-wzr-hp-g300nh-jffs2-sysupgrade.bin with checksum a56542d15a1109b92b2afbfcd9198a9d (“OpenWrt Attitude Adjustment 12.09-rc1 / LuCI 0.11 Branch (0.11+svn9425)”).


I downloaded openwrt-ar71xx-generic-wzr-hp-g300nh-jffs2-sysupgrade.bin from the OpenWRT website.

I then used the web interface to flash the new firmware to the router (after backing up my previous settings of course).

During the flashing process the front red diag LED will go on and stay fixed for a while (several minutes – be patient).

Eventually the log-in screen should display.

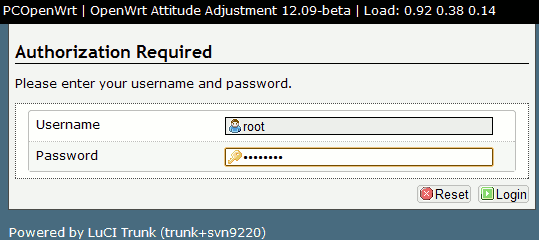
Log In Screen Of Attitude Adjustment 12.09 Beta

Log In Screen Of Attitude Adjustment 12.09 Beta

I’ve not noticed – straight away – any significant changes in the web interface.

The ssh login screen is a little different:

root@myserver:~# ssh -p22 192.168.1.1


BusyBox v1.19.4 (2012-08-26 12:49:54 UTC) built-in shell (ash)
Enter 'help' for a list of built-in commands.

  _______                     ________        __
 |       |.-----.-----.-----.|  |  |  |.----.|  |_
 |   -   ||  _  |  -__|     ||  |  |  ||   _||   _|
 |_______||   __|_____|__|__||________||__|  |____|
          |__| W I R E L E S S   F R E E D O M
 -----------------------------------------------------
 ATTITUDE ADJUSTMENT (12.09-beta, r33312)
 -----------------------------------------------------
  * 1/4 oz Vodka      Pour all ingredients into mixing
  * 1/4 oz Gin        tin with ice, strain into glass.
  * 1/4 oz Amaretto
  * 1/4 oz Triple sec
  * 1/4 oz Peach schnapps
  * 1/4 oz Sour mix
  * 1 splash Cranberry juice
 -----------------------------------------------------

The /etc/config/wireless appears to have lost the “hwmode” option so I added it by putting the following line in:

config 'wifi-device' 'radio0'
  ...
  option 'hwmode' '11ng'
  ...

… this made my Wireless interface top speed 78Mbit/s.

OpenVPN Adventures Today

Setting Up OpenWRT As An OpenVPN Client

I wanted to set up my wireless router so that all LAN (including wi-fi) connections to it would be tunnelled through OpenVPN to a remote OpenVPN server on the Internet. This turned out to be a lot more time consuming than I wanted it to be.

OpenVPN Client With OpenWRT Router

OpenVPN Client With OpenWRT Router

Above is a diagram of the set-up I wanted to establish.

Set Up OpenVPN

Packages you’re going to want to install: openvpn, ip. The ip package is very important because it has the ip route command which sets the default route after a successful tunnel has been established.

Here is my OpenVPN client settings in file /etc/config/openvpn on my OpenWRT router:

config openvpn sample_client        
        option enable 1 # Set to 1 to enable
        option client 1
        option pull 1

        # choice of tap/tun must be the same as server
        option dev tap
#       option dev tun

        # I started with TCP but moved to UDP
#       option proto tcp
        option proto udp

        # UDP MUST be fragmented
        option tun-mtu 1200
        option fragment 1000

        # The hostname/IP and port of the server.
        # You can have multiple remote entries
        # to load balance between the servers.
        list remote "1.2.3.4 1195" # myopenvpnserver.com

        # Keep trying indefinitely to resolve the
        # host name of the OpenVPN server.
        option resolv_retry infinite

        option nobind 1 # no need to bind to specific local port

        # Try to preserve some state across restarts.
        option persist_key 1
        option persist_tun 1

        # SSL/TLS parms.
        option ca /etc/openvpn/ca.crt
        option cert /etc/openvpn/client-homerouter.crt
        option key /etc/openvpn/client-homerouter.key

        # If a tls_auth key is used on the server
        # then every client must also have the key.
        option tls_auth "/etc/openvpn/ta.key 1"
        option dh "/etc/openvpn/dh2048.pem"

        # Enable compression on the VPN link.
        # Don't enable this unless it is also
        # enabled in the server config file.
        option comp_lzo 0

        option verb 3 # Set log file verbosity.

        option status /tmp/openvpn-status.log

Your OpenVPN configuration may be somewhat different depending on what certificates you use, whether you use TA or DH, whether you use compression, or TCP/UDP (but I’ll discuss TCP/UDP a little later).

Now for OpenVPN to start automatically you need to run the following command on the server:

cd /etc/rc.d
ln -s ../init.d/openvpn /etc/rc.d/S46openvpn

This will ensure OpenVPN is started upon reboot after the network has been configured.

Finally – if you use UDP then (as I describe further down) you need to establish a static route to your VPN server out the eth1 (WAN) port so that those packets can still go where they need to go after the VPN sets a default route to itself. You can run:

ip route add 1.2.3.4/32 via 192.168.0.1

… where 1.2.3.4 should be replaced with your OpenVPN server address, and 192.168.0.1 should be replaced with your upstream router IP address.

However if you want this to happen automatically on boot then add the following to your /etc/config/network file:

config 'route'
        option 'interface' 'wan'
        option 'target' '1.2.3.4'
        option 'netmask' '255.255.255.255'
        option 'gateway' '192.168.0.1'

Network

It becomes necessary to edit /etc/config/network so that the following section is added:

config 'interface' 'vpn'
        option 'ifname' 'tap0'
        option '_orig_ifname' 'tap0'
        option '_orig_bridge' 'false'
        option 'proto' 'none'

Also you will have to add the following line to your config 'interface' 'wan' block:

        option 'metric' '20'

This is so that the WAN default route becomes lower in priority to the VPN default route when the VPN is established.

Firewall

This is the trickiest bit. And for me didn’t actually work until I did a reboot!

In this example the file /etc/config/firewall is being edited:

I added a zone:

config 'zone'
        option 'name' 'vpn'
        option 'input' 'ACCEPT'
        option 'output' 'ACCEPT'
        option 'forward' 'ACCEPT'
        option 'network' 'vpn'
        option 'masq' '1'

Note the ‘masq’ option. It is important that this setting is present in both the ‘vpn’ and ‘wan’ zones but not the ‘lan’ zone.

Next I added two forwarding rules:

config 'forwarding'
        option 'src' 'vpn'
        option 'dest' 'lan'

config 'forwarding'
        option 'src' 'lan'
        option 'dest' 'vpn'

Okay time to reboot router!

At The OpenVPN Server Side

I was running my OpenVPN on an Ubuntu server. There were a few things I had to do before everything would go smoothly, however, mostly involving the firewall and iptables.

Firstly I needed a MASQUERADE rule. My OpenVPN server was configured to be 172.17.0.1/16 (that’s the IP address to which all clients would forward packets). So anything coming from that address destined for the Internet (eth0) needed to be MASQUERADE-d. In my /var/lib/iptables/active file (which I restore using iptables-restore on boot I added:

*nat
:POSTROUTING ACCEPT [0:0]

-A POSTROUTING -s 172.17.0.0/16 -o eth+ -j MASQUERADE

COMMIT

I also needed, in the *filter tables, rules to permit forwarding to/from the TAP interface:

-A FORWARD -i tap+ -j ACCEPT
-A FORWARD -o tap+ -j ACCEPT

TCP vs UDP

I started with a TCP OpenVPN client connection – this would be established fine. But I had an infuriating problem. The connection kept dying after 1-4 minutes. I would get log entries in the server like this:

Sun Sep  2 17:34:07 2012 client-homerouter/2.4.6.8:35955 [client-homerouter] Inactivity timeout (--ping-restart), restarting
Sun Sep  2 17:34:07 2012 client-homerouter/2.4.6.8:35955 SIGUSR1[soft,ping-restart] received, client-instance restarting
Sun Sep  2 17:34:07 2012 TCP/UDP: Closing socket

I never resolved this. The closest I got was pulling out tshark on the server and tcpdump on the OpenWRT router and could see that TCP-retransmission packets were being sent back to the client but would never get a response from the router. No idea what the problem was.

This seems to have been resolved with switching to UDP – at least with UDP there are no retransmissions if a packet gets dropped. However UDP simply won’t work unless data is fragmented (see below).

Errors Encountered

FRAG_IN error flags=0xffffffff: FRAG_TEST not implemented

This was turning up in my OpenVPN server log after I switched from TCP to UDP. I’d set the tun-mtu and fragment options in my server.conf – but on my Android phone I had not set these values. By editing my OpenVPN connection on my Android phone, I then selected menu->Advanced and then at the bottom added the extra arguments:

--tun-mtu 1200 --fragment 1000

.. and this stopped the above errors in my server log.

read UDPv4 [EHOSTUNREACH]: No route to host (code=148)

On my OpenWRT router, which was acting as an OpenVPN client, I would be getting these errors – and this happened when I switched from TCP to UDP.

The problem was this: the connection would establish fine – I could see it established in my server log. But then something curious happened. The server would send UDP traffic to the client (my router) but my client (the router) would never send any more UDP packets after the connection was established.

Eventually I realised this: when an OpenVPN client establishes a connection I make it set the default route to be through that VPN tunnel. However the UDP packets the client was sending – which were being sent to the IP address of the server – were now being sucked into the new default route (in to itself) – hence they disappeared.

This didn’t happen with a TCP connection because a connection is established once: at the beginning of the connection. Hence it didn’t matter if the default route changed mid-way through the connection – because the connection had already been established. But UDP packets are independent entities – every single one of them. So the instant the default route changed the outgoing client packets were just going into the VPN tunnel instead of out the WAN link.

This was fixed by adding another specific route. E.g. if my VPN server was 14.1.2.3 then I should add the command:

ip route add 14.1.2.3/32 via 192.168.0.1

..(where 192.168.0.1 is my upstream router/WAN gateway).

read TCPv4_CLIENT []: No route to host (code=148)

This is the error I’d receive when my TCP-based OpenVPN connection would stop working. Looking back I suspect this is identical to the UDPv4 problem above – just that it would take a few minutes before causing the problem rather than right away as in the case of UDP. The solution, of course, is to add a static route to the OpenVPN host through the WAN port.

Notes For Upgrading To Attitude Adjustment 12.09

After I upgraded the router to OpenWRT Attitude Adjustment 12.09 Beta I had to re-establish a few things:

opkg install openvpn
opkg install ip

cd /etc/rc.d
ln -s ../init.d/openvpn /etc/rc.d/S46openvpn

While this will set up the tunnel I don’t seem to be getting the default route being set to point at the tunnel anymore. I can still manually force this by issuing the following command:

ip route add 0.0.0.0/0 via x.x.x.x

…where x.x.x.x is the next-hop address of the OpenVPN server.

How To Add A Port Forward Using The Web Interface On OpenWrt 10.03.1

I’ve seen forum posts ask about how one can open a port on their router to forward to their PS3 (for example) and so I’ve decided to put together this quick how-to with the web interface the router provides.

In this example we’ll open port 80 (the HTTP port) from the outside world and re-direct any traffic that comes in to a specific machine in our local network. In this example it is assumed that the address of the router is 192.168.1.1 and that the local machine in our network (the HTTP server) will be on 192.168.1.3. Your specific network may be different – your PS3 might be on a different IP address internally and the port you want to use might be 5223 – and if you have several ports you’ll have to go through these stages for each port.

The following figure illustrates the connection from the Internet to the device you are wanting to forward traffic to:

Connection Diagram of Port Forward through OpenWRT Router

Connection Diagram of Port Forward through OpenWRT Router

Open a web browser page to the router (this usually requires visiting something like http://192.168.1.1/ or whatever you picked for your router) and then logging in.

Next select the “Network” tab at the top of the page, and then “Firewall” sub tab.

Select the Network tab at the top of the page, then the Firewall sub-tab

Select the Network tab at the top of the page, then the Firewall sub-tab

About halfway down the Firewall page there will be a box titled “Redirections”. Find it and press the
“Add” button.

Find the Redirections box in the Firewall page and press the Add button

Find the Redirections box in the Firewall page and press the Add button

Now give your new port-forwarding rule a name – it can be anything – for example in this case “incoming_80” was chosen. Next you can decide which protocols to forward – you can choose TCP, UDP, or TCP AND UDP (TCP+UDP). If you don’t know – pick TCP+UDP.

Choose a name for the new port-forwarding rule and which protocols to forward

Choose a name for the new port-forwarding rule and which protocols to forward

Then you must pick the port to forward (i.e. incoming packets to the router hitting this port will be forwarded.. usually it is the same number as the port of your internal device you want forwarded). In this case it is port 80. Then you have to pick the IP address of your internal device (e.g. web server, PS3) to forward the packet to – OpenWRT will offer a drop-down list of IP addresses it has detected on your internal network to make this easier – in this case 192.168.1.3 was entered). Finally enter the port number of the internal device the packets should be forwarded to; this doesn’t have to be the same as the port the router is listening to on the Internet – but is usually the same. Don’t forget to Save & Apply!

Enter the WAN port to forward, the IP address to forward to, and optionally the port to forward to

Enter the WAN port to forward, the IP address to forward to, and optionally the port to forward to

When you return to the Firewall page (after saving) you will see your new rule in the Redirections box. You can add another rule now if you have more ports to forward!

You will see your new rule in the Redirections box on the Firewall page

You will see your new rule in the Redirections box on the Firewall page

All done!

OpenWRT on Buffalo WZR-HP-G300NH 10.03.1

I browsed the OpenWRT website today and noticed that the final release of version 10.03.1 of OpenWRT was made available yesterday!

So I downloaded http://downloads.openwrt.org/backfire/10.03.1/ar71xx/openwrt-ar71xx-wzr-hp-g300nh-jffs2-sysupgrade.bin and then logged into my router running 10.03.1-rc6, navigated to the “System” tab, then the “Backup/Flash Firmware” tab, then clicked “Generate archive” to take a backup of my configuration, and then submitted the firmware image I downloaded above.

The flash procedure takes several minutes – the first minute or two the router appears to be functioning as normal – and traffic still flows through the router as if nothing has changed. But eventually the router reboots – and takes a little while to power up.

One the router is back up my attached computers (Windows 7 and Ubuntu server) did not detect that the Ethernet was back up – so I unplugged all the Ethernet cables in the back of the router and plugged them all back in.

Running fine now!